Have you recently noticed a hairline crack in your bath? Before you panic and call a professional, let us ask you this: what if you could easily fix it yourself? Yes, it’s true! With the right materials and simple steps, you can repair a hairline crack in your bathtub and restore its appearance without breaking the bank.
Imagine saving time and money by taking matters into your own hands. No need to rely on expensive repairs or wait for a professional to fix the problem. By following our step-by-step guide, you’ll be able to tackle this issue head-on, giving your bath a new lease on life.
In this article, we will delve into the common causes of bathtub cracks, how to assess the damage and choose the right repair kit, cleaning and preparing the crack, applying the repair agent, sanding and polishing the repaired area, and finally, preventing future cracks and maintenance tips. So, are you ready to dive in and learn the secrets of DIY bathtub crack repair? Let’s get started!
Common Causes of Bathtub Cracks

Bathtub cracks can be a frustrating issue that not only affects the appearance of your bathroom but can also lead to leaks and further damage if left untreated. Understanding the common causes of bathtub cracks can help you prevent them and maintain the longevity of your bath.
There are several factors that can contribute to bathtub cracks. Here are some common causes to be aware of:
- Lack of Support: Improper installation or insufficient support can cause flexible materials like fiberglass to develop cracks over time. Without proper structural support, the bathtub may start to bend and flex, resulting in cracks.
- Damage from Heavy Objects: Dropping heavy objects onto the surface of the bathtub can create small divots that may lead to larger cracks and crevices. The impact can weaken the material and cause it to break under pressure.
- Damage from Heavy Cleaners: Using harsh and abrasive cleaners like bleach can erode the bathtub’s finish. Over time, the constant exposure to these chemicals can weaken the material, making it more prone to cracking.
It’s important to note that different materials, such as fiberglass, acrylic, porcelain, enamel, or ceramic, may have varying susceptibility to cracks. Understanding the specific material of your bath can help you take the necessary precautions to prevent damage.
To visually illustrate the causes of bathtub cracks, refer to the table below:
| Cause | Description |
|---|---|
| Lack of Support | Improper installation or insufficient support can cause flexible materials like fiberglass to develop cracks over time. |
| Damage from Heavy Objects | Dropping heavy objects onto the surface of the bathtub can create small divots that may lead to larger cracks and crevices. |
| Damage from Heavy Cleaners | Using harsh and abrasive cleaners like bleach can erode the bathtub’s finish, weakening the material and making it more prone to cracking. |
By understanding the causes of bathtub cracks, you can take proactive steps to prevent them and keep your bath in good condition. In the next section, we will discuss how to assess the damage and choose the right repair kit for your bathtub crack.
Assessing the Damage and Choosing a Repair Kit

Before repairing a hairline crack in the bath, it is essential to assess the severity of the damage. Hairline cracks and small damages generally only require surface repair, while larger cracks that cause leaks may require professional assistance.
When selecting a repair kit, consider the material of your bath. Different materials, such as fiberglass, acrylic, porcelain, enamel, or ceramic, may require specific epoxy resins or fillers for proper repair.
To assess the severity of the crack, carefully examine the size and length of the crack. Small hairline cracks that are less than an inch long and do not widen significantly are usually considered minor and can be repaired using DIY bathtub repair kits. Larger cracks that are longer or wider may indicate structural damage or potential leakage, and professional help should be sought.
When choosing a repair kit, ensure it is suitable for the material of your bath. Fiberglass repair kits are designed specifically for repairing fiberglass baths, while acrylic repair kits are suitable for acrylic baths. Porcelain, enamel, and ceramic baths may require different filler types that are compatible with the specific material. Verify the compatibility of the repair product with the material of your bath to ensure effective and long-lasting results.
Assessing Crack Severity Table:
| Crack Severity | Repair Method |
|---|---|
| Hairline cracks (less than 1 inch long, minimal widening) | Surface repair using DIY bathtub repair kits |
| Larger cracks with potential leakage or structural damage | Professional assistance recommended |
Assessing the crack severity and choosing the appropriate repair kit will ensure that you effectively repair the hairline crack in your bath and prevent further damage. By using a suitable repair product that matches the material of your bath, you can restore its integrity and prolong its lifespan.
Cleaning and Preparing the Crack

Before proceeding with the repair, it is essential to clean the hairline crack in your bath thoroughly. This step ensures proper adhesion of the filler and creates a smooth surface for a seamless repair. Follow these steps to effectively clean and prepare the crack:
-
Remove any dirt and debris: Start by wiping away any dirt or debris around the crack using a clean cloth. This step helps to remove any loose particles that could interfere with the repair process.
-
Sand the crack: Next, use fine-grit sandpaper to gently sand the area around the crack. Sanding helps to roughen the surface and improve the adhesion of the filler. Be sure to sand in a back-and-forth motion, creating a smooth and even surface.
-
Protect fixtures and fittings: Before applying the filler, it is crucial to protect any fixtures and fittings near the crack to prevent accidental damage. Cover them with masking tape or plastic sheeting, ensuring they are fully covered and secured.
By following these steps, you will effectively clean the crack, create an ideal surface for filler adhesion, and protect your fixtures and fittings during the repair process.
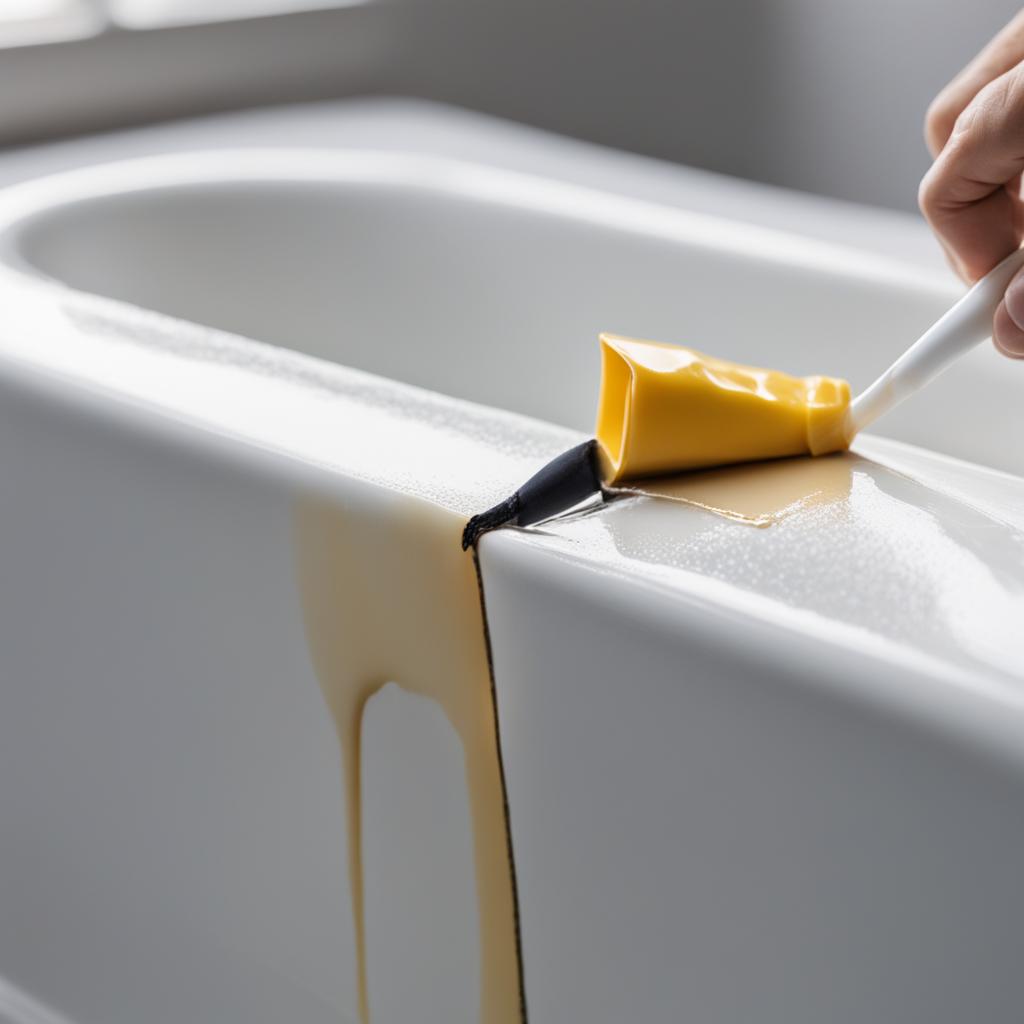
Applying the Repair Agent
Once the crack in your bath is cleaned and prepared, it’s time to apply the repair agent. This step is crucial in fixing the hairline crack and restoring the integrity of your bath’s surface.
Follow the instructions provided in your chosen repair kit to ensure the best results. In most cases, the repair kit will involve mixing a filler with a hardening agent. This mixture creates a strong and durable compound that effectively fills and seals the crack.
Start by mixing the filler and hardening agent according to the specified measurements. This step is essential for achieving the right consistency and maximizing the effectiveness of the repair. Use a stir stick or spatula to thoroughly blend the filler and hardening agent until it forms a smooth and homogenous mixture.
Once the filler is mixed, apply it to the crack in your bath using a putty knife or a spatula. Ensure that the crack is completely filled with the filler, leaving no gaps or voids. With smooth and even strokes, spread the filler along the crack, working from one end to the other.
To create a smooth finish, carefully scrape off any excess filler using the edge of your putty knife or spatula. This step helps in achieving a seamless blend between the repaired area and the surrounding bath surface.
Allow the filler to dry according to the specified drying time provided in the repair kit instructions. It is essential to give the filler enough time to fully cure and harden, ensuring a strong bond and long-lasting repair.
During the drying time, make sure to keep any pets or children away from the repaired area to prevent accidental damage or disturbance to the filler.
Once the filler is completely dry, use sandpaper with a fine grit to carefully sand down the repaired section. This will help in creating a level surface and smooth transition between the repaired area and the rest of the bath.
After sanding, wipe away any dust or debris with a clean cloth or sponge. You can now proceed to the next step, which is sanding and polishing the repaired area to achieve a flawless finish.
| Benefits of Applying the Repair Agent |
|---|
| Restores the integrity of your bath’s surface |
| Fills and seals the crack effectively |
| Creates a smooth finish |
| Strengthens the repaired area |
| Ensures a long-lasting repair |
Sanding and Polishing the Repaired Area
After the filler has dried, it’s time to sand down the repaired area, ensuring a flush and smooth surface that seamlessly blends with the rest of your bath’s appearance. Sanding the filler helps to create a seamless finish, providing a professional touch to your DIY bathtub crack repair.
To begin, use sandpaper with a fine grit to gently sand the repaired area. Start with light pressure and gradually increase as needed. Be careful not to sand too aggressively to avoid damaging the surrounding bath surface. Focus on making the repaired area level and smooth, removing any excess filler or rough spots.
If necessary, repeat the application of filler and sanding process until you achieve the desired seamless finish. Take your time with this step to ensure a high-quality result that you can be proud of.
Once you have achieved a smooth surface, it’s time to move on to polishing. Use a soft buffing cloth or a polishing compound specifically designed for bath surfaces to buff the repaired area. This process helps to restore shine and enhance the overall appearance of the repaired section.
By sanding and polishing the repaired area, you can achieve a professional-looking finish that seamlessly blends with the rest of your bath. Remember to take care and be patient during this process to ensure the best possible results.
The Importance of Color-Matched Repair
When repairing a hairline crack in your bath, it’s essential to consider color matching to achieve a seamless and natural-looking repair. Using a color-matched repair kit or bath spray paint allows you to blend the repaired area’s color with the rest of the bath surface, creating a visually pleasing result.
Color-matched repair kits are available for different bath materials such as fiberglass, acrylic, porcelain, enamel, or ceramic. These kits typically include a range of color options to ensure a close match to your bath’s original color. Follow the instructions provided with the kit to achieve the best color match.
If a color-matched repair kit is not available or you’re unable to find an exact match, you can opt for a clear or white filler that can blend with most bath colors. However, keep in mind that achieving an exact color match is preferable for a more seamless appearance.
Investing the time and effort to achieve a color-matched repair will result in a bath that looks as good as new, with no visible signs of the previous hairline crack.
Preventing Future Cracks and Maintenance Tips
To prevent hairline cracks and maintain the longevity of your bath, there are several key measures you can take. First and foremost, ensure proper installation with sufficient support. This will greatly reduce the risk of cracks forming in the future. If you are unsure about the installation process, it’s always recommended to seek professional assistance to ensure it is done correctly.
Another important factor in preventing cracks is to avoid using harsh cleaners on the surface of your bath. These cleaners can erode the finish and make it more susceptible to cracks. Instead, opt for mild soaps or specialized bathtub cleaners that are gentle on the material while still effectively removing stains and grime.
In addition to proper installation and gentle cleaning, it’s crucial to avoid subjecting your bath to heavy impacts from objects. Dropping heavy items onto the bath’s surface can cause divots and small damages that may eventually lead to larger cracks. Always handle objects with care and avoid placing heavy items directly on the bath whenever possible.
Lastly, regular cleaning and maintenance will help keep your bath in good condition and prevent future issues. Clean the surface regularly to remove dirt and prevent buildup that can weaken the material over time. Additionally, check for any signs of wear or damage and address them promptly to prevent further deterioration. By following these preventive measures and practicing proper maintenance, you can minimize the risk of bathtub cracks and enjoy a durable, long-lasting bath.
